Unlike other AI tools, accessing AutoGPT's platform and features does not involve a simple sign-up procedure. To start using AutoGPT, you will need to download various software components to meet the necessary requirements. To assist you with this process, we have provided a step-by-step guide for installing AutoGPT.
Unlike other AI tools, AutoGPT does not have a simple sign-up procedure to access its platform and features. Before you can start using AutoGPT, you need to download various software to meet the requirements. To make things easier for you, we have provided a step-by-step process for installing AutoGPT.
Step 1: Download Prerequisite Software
To install AutoGPT, you will need three main software requirements: Git, Python, and Visual Code Studio. You can use the quick links provided in the AutoGPT notion doc to download all three software.

Step 2: Create an OpenAI Account for API Keys
If you do not have an OpenAI account yet, you need to create one. Once you have an account, go to the API Keys tab. There, you will find an option (highlighted below) to create a secret key. Click on it, and then copy the secret key.

Step 3: Copy AutoGPT Repository to Your Hard Drive
There are two main steps to copy the AutoGPT GitHub repository to your hard drive. First, copy the link of the project from GitHub.

Second, open the command prompt and clone the AutoGPT GitHub repository by pasting the link as shown in the image below.

If you have Visual Code Studio installed, you can also type code in the command prompt to access AutoGPT from the Visual Code Studio editor.
Step 4: Install Python Modules
Once you have opened Visual Code Studio, you will see several files on the left-hand side. One of these files is called requirements.txt. In this file, you will find the necessary modules for AutoGPT to run.
To install these modules, type pip install -r requirements.txt and press enter. Note: Make sure that the directory is correctly pointed to the location where you copied the repository.
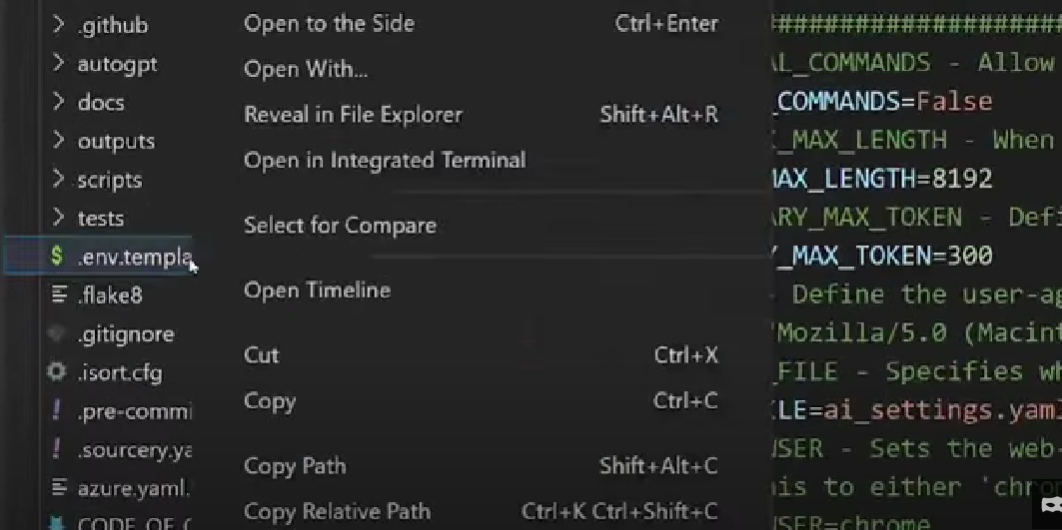
Step 5: Rename the .env.template File
Locate the .env.template file in Visual Code Studio and remove the "." and "template."
Step 6: Enter OpenAI API Keys
The final step is to paste your API keys in the .env file. After you have entered the key and saved the file, go back to your command prompt and type python -m autogpt. That's it! You have now successfully installed AutoGPT and can start using it.

Closing Thoughts
While I believe the possibilities of AutoGPT are exciting to watch, it is important to have realistic expectations when it comes to emerging technologies. AutoGPT has only been launched for less than a month, so we have not yet seen the full extent of what this new AI application can and cannot do in different use-cases. Additionally, it raises concerns about personal privacy and data security that need immediate attention.
That being said, I think AutoGPT is revolutionizing how we interact with language models like GPT-4. It allows us to see how AI approaches problems, learns from mistakes, and delivers good results, which helps us optimize our prompts more effectively. So while AI agents are here to stay, they will take time to mature and gain meaningful user adoption.